Search our content library
Creating tasks
Easy task creation makes for a frictionless transition from a loose team discussion to a concrete plan of action that everyone can find, view, prioritize and collaborate on.
It’s unbelievably easy to create tasks, no matter whether on Slack, Microsoft Teams or on the taskboard. The steps below show you how to do so.
In the web application
- Locate the taskboard on your Kanban board where you want to add a task. For example, #recruit-development-team.
- Click the blue + icon on the far-right side of the taskboard window.
- In the Create a task dialog that displays, type "Recruit Programmers."
- Press the Save button and the "Recruit Programmers" task displays on the taskboard.
- Click the three-dot icon in the upper-right corner of the task box to edit the task, set the status, assign a resource, assign a due date, set up or assign a label, and more.
- Open Slack or Microsoft Teams and you see the Workstreams bot, which tells the channel you just created the "Recruit Programmers" task. A New Thread also appears detailing the addition of the task.
In Slack
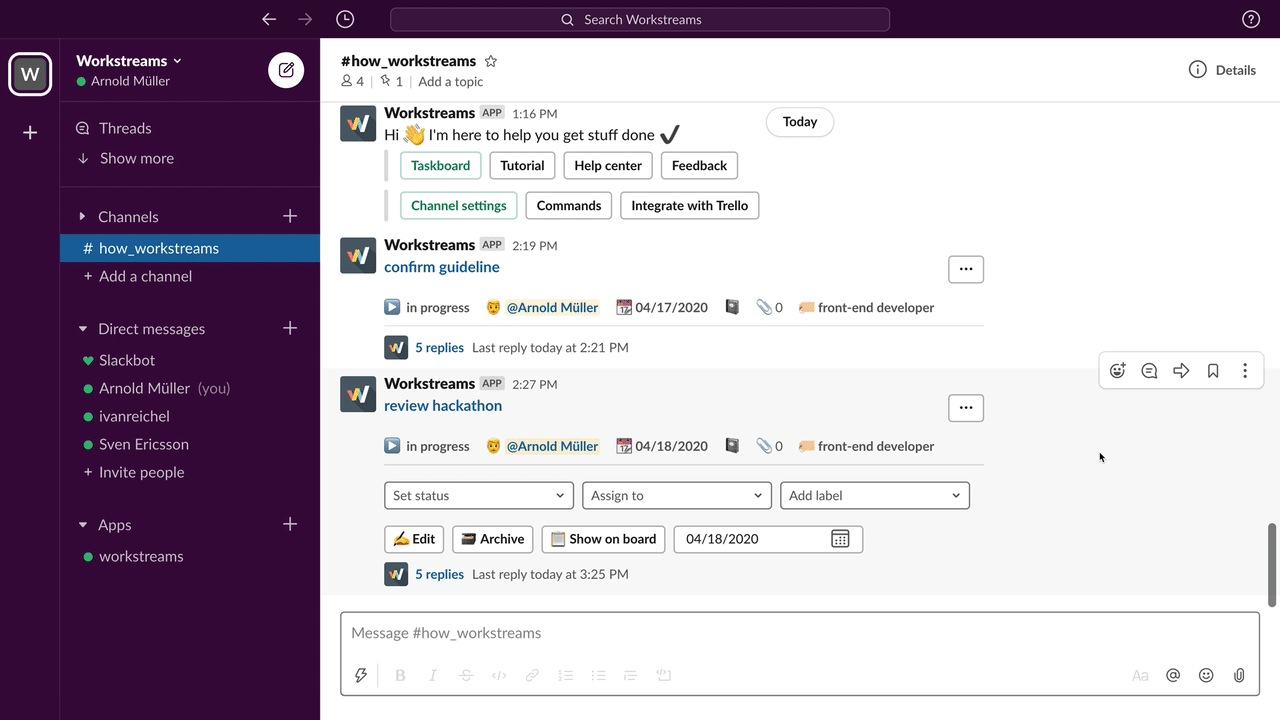
- Go to the channel where you want to add a task. For example, #recruit-development-team.
- Type /plan Recruit Programmers.
- Press Enter and the "Recruit Programmers" task is created. The Workstreams bot shows the task details in the channel and sets an initial status of planned.
- Click the Edit button to add a Due Date or a Description. Use the Set Status, Assign to or Labels drop-downs to further modify the task.
- Click the Recruit Programmers hyperlink to jump to it on the web app where you can also modify task details.
TIP—With the Slack app, you can create tasks within a discussion. That way your brainstorming sessions end up with action items! For example, a team member indicates that a Project Manager also needs to be recruited for the team. Just type /plan Recruit Project Manager and the first step towards hiring is in your plan. Next, type /plan Interview Project Manager and then /plan Send Offer to Project Manager and then /plan Hire Project Manager and all four steps of your plan are in place.
In Microsoft Teams
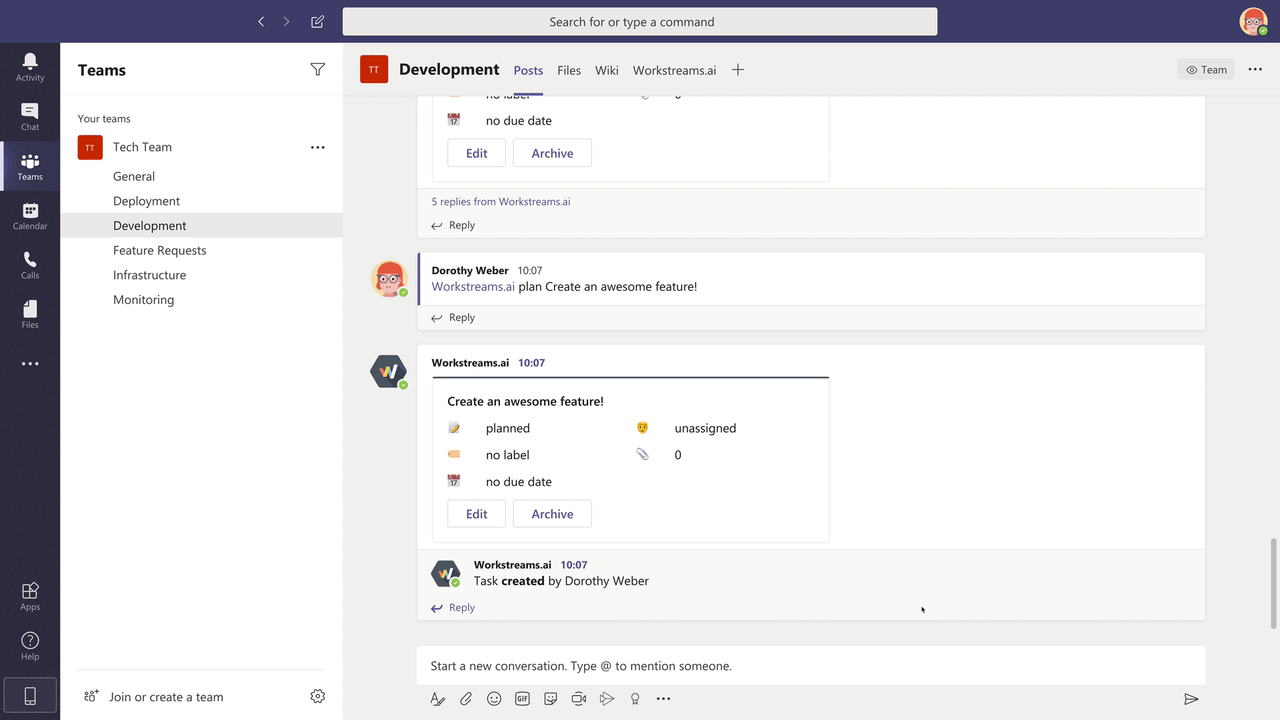
- Go to the channel where you want to add a task. For example, let's use our hiring example and go with the recruit-development-team channel.
- Type @workstreams.ai plan Recruit Developers.
- Press Enter and the "Recruit Developers" task is created in your conversation. The Workstreams.ai bot shows the task details in the channel and sets the status to planned.
- You can further edit the task from this message.
TIP—You can also use the interactive menu that appears after you've mentioned Workstreams.ai. Just select plan to create a task. To add a description to the task while you are creating it, use the following scheme: @workstreams.ai plan title-of-task :: description-of-task.
Editing tasks
Editing tasks lets you inform others about the constraints and requirements of a given task. It also lets you provide context to the task at hand with a description, so that others know when and how to approach completing a task.
It’s even easier to edit tasks and you can do it from inside of Slack, Microsoft Teams or on the taskboard.
In the web application
- Select the taskboard where you want to edit a task.
- Click on the task box on the Kanban board and "Add description" displays.
- Click Add description.
- Type the relevant information required to get your task done.
TIP —Enhance your task descriptions with advanced text editing.
Text formatting options for Slack users
Slack users have several great ways to show what they need to show in their tasks’ descriptions. They are as follows:
- Add *asterisks* to your text to make it Bold
- Add _underscores_ to make your text Italic
- Add ~tilde~ to text you want to
strike through - Add `code` to format your code
- Add ```code block``` to further format your code
- Add > greater than symbols > to format a quote
Text formatting options for Microsoft Teams users
Microsoft Teams users have their own unique mix of text formatting options that are every bit as powerful at giving clarity and context to any task description.
- Add **asterisks** to your text to make it Bold
- Add _underscores_ to make your text Italic
- Add a - dash to give your text • bullet points
- Add a 1. Number with a period to give your text a numeric list
In Slack
- Go to the channel where you want to edit a task.
- Type /tasks
- Select the task you want to edit from the drop-down list. For example, "Recruit Programmers."
- The task details display along with various buttons and drop-downs that let you modify the task.
- Click the Edit button to edit the task.
- Edit the Title, Due Date or Description in the popup dialog. For example, you could type “let's discuss our plan for this” in the Description.
- Press the Save button when you are done.
TIP —If you prefer to edit the task on the Kanban board, click the Recruit Programmers hyperlink to jump to the task on the web app where you can also edit it, as described in the steps below.
In Microsoft Teams
- Go to the channel where you want to edit a task.
- Type @workstreams tasks and press Enter.
- Use the dropdown menu to find the task you want to edit. In our case "Recruit Developers" and click Go.
- workstreams.ai will bring the task to your view. Click Edit.
- From this view you can edit the title, description, assignee and status of the task.
- Click Save to keep your edits.
Adding Custom fields to your tasks
Custom fields let you make your tasks reflect the way you and your team actually work. Easily add the key info you need to get your tasks done even faster!
In the web application
- Go to the task where you would like to create a custom field.
- Click +Add custom fields.
- Click +Create new custom field to add a new field to your task.
- Choose what type of input your custom field needs (text, numbers, date, monetary) by selecting the appropriate icon.
- Hit Create to create the custom field on your task.
- You can select and deselect an existing field that is already in your custom fields library. You can select and deselect multiple fields if needed simply by clicking on them.
- Click on newly-created fields to add the necessary task-related information.
- Any custom fields you created will be saved for future use throughout your workspace and can be added to any task on any taskboard you need.
TIP— You can remove custom fields from a task in a single click by clicking on the field when viewing your list of custom fields.
In Slack
- Go to the task that you would like to add custom fields to and click Edit.
- Hit the Add fields button in the custom fields section of the task editor. If there are already custom fields in your task, the button will be Edit fields.
- To create a new field, hit the create new button, then enter the name of the field. Then hit save.
- To add an existing field that’s already in your workspace, type to find the existing field's title, then click save.
- Add your subtask items
- You can enter the content for a field back in your task editor by clicking your new input field.
Adding Custom fields to every task on your taskboard
Many taskboards are based on a standard workflow, where you may need to fill out the same fields for every task. If that’s the case, you can add custom fields on a taskboard level instead of individually adding the same field to every task.
In the web application
- Go to your Taskboard settings by clicking the gear icon on the top navigation of your taskboard.
- Click on the Custom fields tab at the top of the taskboard settings modal.
- Click +Create new custom field to add a new field to your taskboard.
- Choose what type of input your custom field needs (text, numbers, date, monetary) by selecting the appropriate icon.
- Hit Create to create the custom field and apply it to all tasks on your taskboard.
- You can select and deselect an existing field that is already in your custom fields library. You can select and deselect multiple fields if needed simply by clicking on them. A task has content in the custom field, deselecting will not remove the custom field from that task (until the content is removed).
- Click on newly-created fields to add the necessary task-related information.
- Any custom fields you created will be saved for future use throughout your workspace and can be added to any task on any taskboard you need.
TIP— Remember, custom fields added from taskboard settings will add that custom field to all tasks on that taskboard. Newly-created tasks on this taskboard will also contain the selected custom fields. Tasks moved to your taskboard from other boards will not contain the taskboard-specific custom fields of the taskboards they are moved to.
In Slack
- Go to your pinned items in a Slack channel where the workstreams.ai bot has been added and locate the workstreams.ai menu.
- Click on Settings and then select the Custom fields tab.
- To create a new field, hit the create new button, then enter the name of the field. Then hit save.
- To add an existing field that’s already in your workspace, type to find the existing field's title, then click save.
- These fields can be edited further on individual tasks in the task editor of any task in this channel.
Adding subtasks to a task
Many tasks need to be broken down into smaller steps to be completed clearly and coherently - this is especially true when task completion relies on more than one person.
Subtasks are great for tasks requiring multiple steps before they can be completed. They also serve as a helpful reminder of what needs to be done next.
In the web application
- Select the taskboard where you want to add a subtask.
- Select a task.
- Click the Add subtask button.
- Start typing your first subtask item.
- Press Enter to add the next item.
TIP— Use drag and drop to reorder your tasks however you like. As you finish specific items you can tick them off as done. You can also delete no longer needed items.
In Slack
- Select the channel where you want to add a subtask to a task.
- Find the task you want to add a subtask to
- Choose Edit from the three-dot menu in the upper right corner
- Click Add subtask
- Add your subtask items
- Click Save
Adding assignees and due dates to subtasks
Give each subtask its unique assignee and due date, so you can see who is responsible for completing each subtask, as well as when the subtask must be finished by.
Even better, subtask assignees will see their subtasks as a part of their My Tasks view. They will also be notified either in Slack or Microsoft Teams whenever assigned to a subtask.
In the web application
- Select the taskboard where you want to add more details to a subtask.
- Select a task.
- Click the Add subtask button to create your subtasks and press enter to save it and add more.
- Hover over a created subtask (or swipe on mobile) to see your options to add an assignee or a due date to the subtask.
- On the right-hand side of any subtask, hit the person icon to Add an assignee, or the calendar icon to add a due date to your subtask.
- Select the team member you want to be assigned to that specific subtask and/or select the due date or date range for your subtask.
TIP— Move your earliest due dates to the top of your subtasks list and your furthest-out due dates at the bottom. This keeps your priorities clear and organized.
In Slack
- Select the channel where you want to add assignees and/or due dates to subtasks.
- Find the task where you want to add assignees and/or due dates to its subtasks.
- Choose Edit from the three-dot menu in the upper right corner
- Click Edit subtasks
- Click the Assign to dropdown below any subtask and select a team member to make them an assignee to that subtask.
- Click the Calendar icon next to Select a date below any subtask and click the desired due date or date range for that subtask.
- Click Save
Subtask linking
This feature allows you to link an existing task to a checklist item that is present on a different task? Sounds confusing? Let's go over an example! It often happens that folks create a task with a subtask, that then they assign to a person. This person then creates a task for that specific checklist item, creating a duplication! What this new feature allows, is for these two properties (the subtasks and the newly created task) to be linked! So when the task is completed, the subtasks are automatically checked too! How great is that? Here's how to do it:
In the web application
- Open a task.
- From the checklist item, hover over a subtask. The link icon appears.
- Click it.
- Select your task.
- Done! Now the task is neatly linked to the subtask.
Restricting subtask completion to specific worksteps
Create controls that fit the procedures at your company! Sometimes certain parts of completing a task need to be checked off during a particular step in your workflow. For that, we have subtask restrictions! You can limit when a subtask can be marked completed to a specific workstep on your taskboard.
In the web application
- Go to a task already containing subtasks.
- Click on the empty circle on the subtask that you would like to restrict.
- Choose from the dropdown the workstep where you would like to have this subtask marked as completed.
TIP— You can use bulk actions to restrict multiple subtasks at the same time.
Repeating tasks
This feature allows you and your team to set up automated task creation at an interval of your choosing. You can have the same task repeated every day, on a specific day of the week, or on a specific day of the month. It comes in handy for tasks you and your team do on a regular basis and acts as a kind reminder that the job needs to be done. Here is how to do it on the taskboard.
In the web application
- Navigate to any task for which you want to set the repetition.
- Click on the "Repeat task" action menu on the right
- A panel appears
- Select the time interval from the dropdown menus.
- Click "Create".
TIP— Once the repetition has been set, you can always update it or remove it straight on the task.
Task Reminders
Like with everything, tasks can sometimes be overlooked, missed, or forgotten. This is where our reminders come into play! Set useful reminders on each task you want to come back to at a later stage and get the job done. Here's how to do it in the app.
In the web application
- Select the task you want to be reminded of
- Click the Set reminder button on the right.
- Choose your reminder interval or make one your own
- Click Save.
And that's it! Look out for the reminder in the app!
Updating task status
Updating your tasks’ status on time makes sure that others always have a real-time overview of the progress that you and your collaborators are making.
When you want to make an update to the status of a task in workstreams.ai, you can easily do so from Slack, Microsoft Teams, or the taskboard.
In the web application
- Locate the task in the taskboard.
- Click the three-dot menu icon or just right-click on the task.
- Choose Change status from the dropdown menu.
- Select your status update.
In Slack
- Go to the channel where you want to update the status of a task.
- Type /tasks
- Select the task you want to edit from the drop-down list.
- Click the Edit button to edit the task or update the status straight from the task message itself using the dropdown menu option.
In Microsoft Teams
- Go to the channel where you want to update a task.
- Type @workstreams tasks and press Enter.
- Use the dropdown menu to find the task you want to edit.
- workstreams.ai will bring the task to your view.
- Click Edit. From this view, you can update the status of the task.
- Click Save.
Creating and using task templates
Task templates both organize your work and reduce repetition by letting you save the details and formats of important routine tasks, or groupings of multiple tasks, for future use.
Task templates are a great way to save valuable time by re-creating the same set of tasks over and over again. Here is how to use them:
In the web application
- Open the taskboard(s) that contain the tasks you want to have as part of the template.
- Click on the Open task template panel in the taskboard menu.
- Click on the tasks you want to have as part of the template. You will see them move to the right on the panel.
- Optional: Name your template.
- Optional: You can choose to make the template private. By default, it is made public to your entire team.
- Click Save template.
To use your newly created task template, simply follow these steps:
- Click on the New task button.
- From the task creation menu, select the From templates tab.
- Choose the template you need from the dropdown menu.
Adding due dates
Due dates on tasks make setting priorities a faster and more transparent process. When synced with a calendar, they also make it easier for you to communicate to others what you need to get finished, and when.
Add a start and due dates to your most important tasks to ensure you’re not just on schedule, but ahead of schedule.
In the web application
- Select the taskboard where you want to edit a task.
- Click on the task box on the Kanban board.
- Click the three-dot icon in the upper-right corner of the task box.
- Click the Set Due Date drop-down option.
- Select your desired date on the calendar.
- By ticking the little box in the upper-left corner you can also set a start date for your task.
In Slack
- Go to the channel where you want to edit a task.
- Type /tasks and then select the task from the drop-down.
- Click the Edit button to edit the task.
- Add a Due Date in the format: MM/DD/YY. For example, if the task needs to be completed by the end of the week, which is Friday, May 18, 2018, type 05/18/18.
- Press the Save button.
TIP—Once again, a fantastic feature of the Slack app is that you can modify tasks immediately after the conversation takes place in the channel. For example Team Member 1: "We really need a User Guide for the product?!" You: "Can anyone on the team write it?" Team Member 2: "Not me." Team Member 3: "No way. I write code. Not user Guides." Team Member 2: "We have to hire a tech writer! And soon. We have to have them on board by the end of the week!!" You: /plan Hire Technical Writer. And then you can just edit the due date so that it is the end of the week.
Assigning tasks to team members
You can assign tasks to a fellow team member anytime. Doing so is a great conversation starter when a task needs to get off the ground, and also makes it crystal clear who is primarily responsible for completing a specific task.
Assignees will also get a notification when they are assigned to a task, as well as an updated My Tasks view where all of their assigned tasks are visible.
In the web application
- Select the taskboard where you want to edit a task.
- Click on the task box on the Kanban board. For example, "Recruit Project Manager."
- Click the three-dot icon in the upper-right corner of the task box.
- Click the Assign to drop-down option and your team members display, along with their photo.
- Select the team member from the list to which you want to assign the task and their photo displays in the upper-left corner of the task box, indicating that they are now assigned to the task.
In Slack
- Go to the channel where you want to edit a task.
- Type /tasks
- Select "Recruit Project Manager" from the drop-down.
- Click the Assign to drop-down. All members of the channel display.
- Select the team member to which you want to assign the task.
In Microsoft Teams
- Go to the channel where you want to assign a task.
- Type @workstreams tasks and press Enter.
- Use the dropdown menu to find the task you want to edit. In our case "Recruit Developers" and click Go.
- workstreams.ai will bring the task to your view. Click Edit.
- From the assign to dropdown menu choose the team member best suited for this task.
- Click Save.
TIP-You can assign persons to a task during the task creation process. Just select the team member from the assign to dropdown menu.
Adding a new taskboard
Adding a taskboard makes everything more efficient by aligning your priorities with the priorities of others. Add a new taskboard when a topic, department, channel, or project has reached a scale where a visual overview of your work is needed.
New taskboards can be set up in seconds by following the steps below.
In the web application
- Go to the workstreams.ai taskboard.
- Click the Add new taskboard button in the navigation menu.
- A modal appears.
- You can choose to create a brand new channel for this taskboard, or use an existing Slack or Microsoft Teams channel.
- Add a title, in case you've opted to create a brand new channel.
- Click Create.
TIP—When setting up a new taskboard, you can immediately invite your teammates to it.
In Slack
- Go to the channel where you want to add a workstreams.ai taskboard
- Click on the information icon ( i ) button in the upper right-hand corner of Slack.
- Select the More option. A dropdown will appear.
- Click on Add apps from the dropdown.
- Click on the Add button, next to workstreams.ai, from the list of apps in your workspace.
- A list of options will appear. Click on the Taskboard button to view your new taskboard.
TIP —If you are in a newly-created channel, just click on ‘Add an app’ under the channel’s title and description to quickly add a workstreams.ai taskboard.
Archiving a taskboard
This feature comes in handy when you and your team no longer need a particular taskboard. You can easily archive this taskboard and keep your workspace clean and tidy.
In the web application
Here is how to do it:
- Navigate to the taskboard you would like to archive.
- Click on the "Archive" option in the channel menu. That's the option to the right.
- Select "Archive Taskboard".
- A modal appears.
- Confirm the archival.
Workflows
Workflows are a great new addition to workstreams.ai that empowers teams to expedite their processes and todos. They are a package of collaborative tools that allows teams to design, develop and utilize tailor-made solutions for their work. Our workflows are fully customizable and guarantee efficient, predictable, and repeatable outcomes at scale.
What is a Workflow?
Our workflows consist of the following collaboration & productivity tools:
- Pre-defined worksteps
- Ready-made task templates
- Adjustable custom fields
- Set of labels
What is the Workflow library?
The workstreams.ai workflow library is where you will find the Workflows we've designed in-house, divided into categories like marketing, operations, and procurement. The workflow library is also the place where you can create and edit your own workflows. It is the hub for all of your team's Workflows. You can browse by category or use the search bar.
Accessing the Workflow library
To access the Workflow library:
- Open the workstreams.ai app
- Click on the Workflows section of the navigation panel to the left.
Using a Workflow
Using a pre-defined Workflow
To use a ready-made Workflow:
- Open the Workflow library
- Navigate to "workstreams.ai workflow library"
- Choose your workflow. A preview will open
- Click on Use workflow
Using a workflow created by your team
To use a workflow created by yourself or a teammate:
- Open the Workflow library
- Navigate to "Your team's custom workflows"
- Choose your workflow. A preview will open
- Click on Use workflow
When you click on Use a workflow you will then be directed to a panel asking you to create a brand new taskboard to which your workflow will be applied.
Create a new workflow
Creating a workflow that precisely fits your working processes is simple. To do so, follow these steps:
- Open the Workflow library
- Click on Create new workflow
- The workflow creation panel will open
- Enter the workflow title
- Enter the workflow description. Here you can explain to your team what the workflow is for.
- Add owners. By default, the creator of the workflow is the owner. If you want to permit others to edit the workflow, you can add them as additional owners.
- Add, delete or rename the workflow worksteps. Alternatively, you can load worksteps from one of your existing taskboards.
- Add task templates in this workflow.
- Add custom fields that should be present on every task created in this workflow.
- Choose a set of labels that will be available for the workflow.
- When you are happy with the setup, click Save custom workflow.
Workflow owners
Every workflow must have at least one owner. Only the Workflow owners can make changes to any aspect of the Workflow. To add or edit owners, simply:
- Open the Workflow library
- Choose your workflow. A preview will open
- Click on Edit
- Click on Edit owners
- Change or add more owners
- Click Save changes
Customize a predefined workflow
Our predefined workflows are a great starting point! You can tweak them to fit your way of work with a few easy steps:
- Open the Workflow library
- Navigate to the section named "workstreams.ai workflow library
- Choose your workflow. A preview will open
- Click on Customize
- Here you can customize the workflow to suit your needs
- Click Save custom workflow
Editing a custom workflow
Our predefined workflows are a great starting point! You can tweak them to fit your way of work with a few easy steps:
- Open the Workflow library
- Navigate to the section named "Your team's custom workflows
- Choose your workflow. A preview will open
- Click on Edit
- Here you can customize the workflow to suit your needs
- Click Save changes
NOTE—You can only edit workflows that you are an owner of.
Auto-assign the right person for the task
Small things add up! Set a default assignee to a specific workstep on your taskboard, and make sure the right person works on the right task. Neat automations like these save you valuable time.
In the web application
To apply an auto-assignee to a specific workstep, simply:
- Navigate to your desired taskboard
- Click the "Workstep settings" icon, located to the right of each workstep name
- Click Add assignee
- Choose a team member that will be automatically assigned to tasks in this workstep
Total control with workstep ownership
Some of your processes have crucial worksteps that need tighter control? Put your mind at ease by adding a workstep owner! That way only this person can interact with the tasks that land in that column.
In the web application
To apply a workstep owner, simply:
- Navigate to your desired taskboard
- Click the "Workstep settings" icon, located to the right of each workstep name
- Click Add owner
- Choose a team member that will be the workstep owner
NOTE—The workstep owner will be the only person allowed to interact with the workstep settings and edit the tasks in this workstep. When the workstep owner assigns an auto-assignee, then the assignee will also be able to work on the tasks.
Auto-forwarding a task to a different taskboard
Do you and your team constantly move tasks to another taskboard once they've reached a certain step in the process? With our auto-forward feature, you can easily set up an automation that moves every task once it reaches a specific workstep. For example, once a task reaches the completed step in the ordering taskboard, it can automatically be moved to the accounting taskboard to be processed by your bookkeeping team.
The possibilities are endless, with this flexible feature. Here's how to use it:
In the web application
- Navigate to the taskboard you want to set up an auto-forwarding from.
- Click the workstep settings gear icon on the workstep you want to forward tasks from.
- Choose the Automation tab
- In the dropdown menu, select the taskboard to which you want to forward the tasks.
Inviting team members to a taskboard
An aligned team is an effective team. Whenever you bring people in to work on a taskboard, you are making it easier for everyone to stay up to date on what others are working on and what still needs to be done.
Working on a team is what workstreams.ai is all about. We've made it incredibly easy to invite members of your team to either a newly-created taskboard or an existing one. Here's how to do it:
In the web application
- Go to the taskboard you want to invite people to. You can use the navigation menu on the left or simply press CTRL/CMD + K and type the name of the taskboard.
- Click the gear icon on the right-hand side of the taskboard.
- Select Invite others to this taskboard.
- A modal appears.
- Search for your teammates and add invite them to the taskboard.
- Press Invite to finish.
TIP—When setting up a new taskboard, we include this step right in the creation process. Neat right!?
Removing a workstreams.ai taskboard
Sometimes when projects get finished or when workflows change, a new taskboard is needed and old ones have to go. That’s normal, necessary, and an important part of keeping everyone focused on the right priorities.
Removing a taskboard is simple. See below.
In Slack
- Go to the channel where you would like to remove the workstreams.ai bot. Removing the bot also removes the taskboard from the channel.
- Type in the slash command /remove @workstreams in your channel and then press enter for fast removal.
- Or... if you prefer, you can hit the information (i) icon at the top right of the channel's discussion thread.
- A righthand bar will appear with a list of channel options. From the list of menu items at the top of the bar, select the More option.
- Select View apps in #channel from the dropdown menu. A list of channel apps will appear.
- Hit the Remove button next to the workstreams.ai app icon.
- This will preserve any existing tasks inside of Slack and their content, but the bot will be fully removed, and you will no longer have a taskboard.
- To remove the taskboard AND its connected Slack channel, you can go to a channel's taskboard and hit the Archive icon in the upper right corner of the taskboard on the webapp.
TIP-You can always remove a taskboard on Slack without removing the channel it is attached to. You can also always get the taskboard and all its data back by adding the bot to the channel again.
In Microsoft Teams
We are currently working on a solution to make removing the taskboard from a Microsoft Teams channel possible. Stay tuned!
Using My Tasks
Knowing the priorities and progress of others in your workspace is only helpful when you can see it in the greater context of your own work. My Tasks is a valuable space for maintaining an overview of your work and how it ties back into the work of your closest collaborators.
In the web application
- Select My Tasks in the upper-left corner of the Kanban board. If you have the menu minimized, just click on the icon that looks like a clipboard.
- A list of just your tasks is displayed. Tasks are ordered by the due date. The current status is also displayed for each task on the right side of the task box.
- Also on the right side of the task box is your best friend: the three-dot menu. Use it to edit, assign, attach, or whatever your heart desires just like on the Kanban board.
- Click on any task and it displays in the upper-right corner of the window with more details. Once again, this is just like the detail view that you are used to on the Kanban board.
TIP—Click the + New Task button in the upper-right corner of the window to add a new task. The task defaults to being assigned to you so it will show up right away in your My Tasks lists. Speed demon bonus tip: just click the N key to add a new task.
Sorting tasks in My Tasks
Sorting your tasks from top to bottom, by priority, in your My Tasks view is an excellent way to always be aware of what you need to work on next, and what topics are most time-sensitive.
If you need to manually sort your tasks by different criteria, however, you are free to do so by dragging and dropping your tasks in the order you see fit.
In the web application
- Select My Tasks From the sorting dropdown menu, select Manually
- Simply drag and drop your tasks to your preferred priority.
Using Team Tasks
Use your knowledge of what your closest collaborators are working on and when to set the most pragmatic priorities for yourself. It’s impossible to stay aligned with teammates without having fast access to what they’re currently doing. With Team Tasks, access is always yours.
Transparency is key in any working environment, and our "Team Tasks" feature enables that. Use it whenever you need to know what your team members are currently working on and what they have coming up.
In the web application
- Select My Tasks in the upper-left corner of the Kanban board. If you have the menu minimized, just click on the icon that looks like a clipboard.
- The default choice is My Tasks. Select the Team Tasks option right next to it.
- A search bar appears. Search for a team member and select. You can add multiple team members in the same view.
- A list of just that team member's tasks is displayed. Tasks are ordered by the due date. The current status is also displayed for each task on the right side of the task box.
Following Tasks
It’s important to stay in the know about the tasks that most directly affect your work - even if you aren’t always the one in charge of completing them. Following tasks allows you to keep an eye on tasks of consequence that go beyond the scope of your own work, but still impact you.
In the web application
- Go to the taskboard where you want to follow a task.
- Use the three-dot icon or right-click on the task you want to follow.
- Click the Follow task option from the menu. You will now be notified of any change to the task.
- To add other followers to a task, you can do the same but select the Add followers option right below Follow task on the dropdown.
- The same Add followers action is also possible by enlarging your task ticket by clicking on it and choosing from the menu there.
In Slack
- Go to the channel where you want to follow a task.
- Type /tasks
- Select the task you want to edit from the drop-down list.
- Click the three-dot icon on the right-hand side.
- Select Follow / Unfollow task.
- You can Add followers by hitting the edit button on a task, scrolling down, entering your team members' names in the Followers field, and hitting Save.
Setting up and Using Labels
Labels are a way to color-code and categorize tasks that have something critical in common. Using labels will make specific groupings of tasks more easily searchable by their topic - an essential organizing tool for taskboards that contain a lot of different tasks.
Labels make it quick and easy to locate and identify certain types of tasks on your taskboard. They can also be used to locate dependent tasks when used alongside our Goals feature.
In the web application
- Go to the taskboard where you want to edit a task.
- Click on the task box on the Kanban board. For example, "Recruit Programmers."
- Click the three-dot icon in the upper-right corner of the task box.
- Click the Apply Labels drop-down option.
- Type: "Recruiting"
- It does not yet exist, so select + Create new label. The label is displayed in the drop-down and a color is automatically assigned to the label.
- Locate any other tasks to which you want to assign this label. For example, "Recruit Project Manager."
- Click the three-dot icon in the upper-right corner of the task box.
- Click the Apply Labels drop-down option.
- Select the Recruiting label. Both recruiting tasks are now assigned to the "Recruiting" label.
Filtering on a label on the taskboard
- To filter on the label that you just created, type label:Recruiting in the Type to filter field in the upper-right corner of the window.
- Only tasks with the "Recruiting" label are displayed on the Kanban board.
In Slack
- Go to the channel where you want to add a label to a task
- Type /tasks
- Select "Recruit Project Manager" from the drop-down.
- Click the Label drop-down to see a list of labels.
- Click Add label.
- Type Recruiting
Setting up and Using Goals
Collaborate with cohesion across multiple taskboards! Goals take tasks with the same label and show exclusively these tasks in a multi-taskboard view. This way, people working towards the same shared objective can follow progress on the topics they have in common.
Goals are a web-app-only feature at this time but are still the best way to organize and track all tasks related to a specific objective. To make the tracking of Goal progress as easy as possible, each Goal also comes with a goal-specific progress bar and a Goal-specific burndown chart. Here’s how to start putting Goals to use.
In the web application
- Click Goals in the upper-right corner of the window, and the Goals drawer opens.
- Click + Create New Goal.
- Type the title for your new goal. For example, "Complete Recruiting."
- Type a description. For example, "It is crucial we recruit great people for our team by the end of the week so that we can hire them next week."
- Click in the Due Date entry field to display a calendar.
- Select May 18th on the calendar.
- Select the "Recruiting label" from the drop-down list. Note: You cannot change a label 12 hours after setting it up. This restriction is necessary so analytics around progress can be properly tracked.
- Select a Reporting Channel where you want the goal tracking to display.
TIP–Typically, you can report the progress on goals to the channel with the related tasks, #recruit-development-team in our example. However, you can also set up a new channel in which to display the results. For example, if you only want a select group of managers to see the reporting you could set up a new channel: #recruiting-reports.
Attaching files to tasks
Some tasks require specific content, guides, or materials to be completed. Uploading those files directly to specific tasks keeps all of your collaborative efforts neatly in the same space.
You can attach a file in two easy ways on the workstreams.ai Slack app, and one easy way on the web app.
In the web application
- Select the taskboard that has the task you want to attach a file to. In our example, this is the "Recruit Programmers" task.
- Click the three-dot icon in the upper-right corner of the task box.
- Select Attach files from the drop-down menu.
- Drop your file into the box that says Drop your files here.
- Alternatively, click browse to search your file system.
- Optionally, enter a title for the file where it says Attachment title. This is a good idea if your file name isn’t very user-friendly. For example, if your Whiteboard image is named 7648723456.png you could add a nice friendly title like: Whiteboard_Qualifications.png.
- Click the teal Attach button.
- The paper clip icon in the lower-right corner of the task box indicates that the file was attached successfully.
- Repeat this process to attach more than one file.
In Slack
- Go to the channel where your task is.
- Click Reply to thread or just drag-drop the file.
- Simply upload the Whiteboard_Qualifications.png file in the thread. Easy!
Archiving tasks
Archive completed or not immediately relevant tasks to keep your board organized around the things your team is currently working on. It’s as simple as that.
In the web application
- Select the taskboard where you want to edit a task.
- Click on the task box on the Kanban board. For example, "Recruit Programmers."
- Click the three-dot icon in the upper-right corner of the task box.
- Click the Archive option. A dialog displays asking you to confirm your decision.
- Click the Archive button.
In Slack
- Go to the channel where you want to edit a task.
- Type /tasks
- Select "Recruit Programmers" from the drop-down.
- Click the Archive button. A dialog displays asking you to confirm your decision.
- Click the Yes button.
In Microsoft Teams
- Go to the channel where you want to archive a task.
- Type @workstreams tasks and press Enter.
- Use the dropdown menu to find the task you want to edit. In our case "Recruit Developers" and click Go.
- workstreams.ai will bring the task to your view.
- From the task message, choose the Archive option.
- The task will be archived.
TIP-You can use the Archive option by simply scrolling any task in the conversations into view.
Deleting tasks
If you want to remove a task from your taskboard and are absolutely certain you won’t need that task in the future, then your best bet is to just delete it.
In the web application
- Select the taskboard where you want to delete a task.
- Click on the task you want to delete.
- Click the Delete option. A dialog displays asking you to confirm your decision.
- Click the Delete button.
Finding a specific task
You will find yourself needing to locate a specific task. Doing that is as straightforward as a simple search.
Finding a task is easy both on Slack and Microsoft Teams.
In Slack
- Go to the channel where you want to search for a task.
- Type /tasks and hit Enter.
- A dropdown menu will appear. It contains all tasks in the channel, with those assigned to you being at the top
- Start typing "project manager" to search for your task. Magical!
In Microsoft Teams
- Go to the channel where you want to find a task.
- Type @workstreams tasks and press Enter.
- Use the dropdown menu to find the task you want to edit. In our case "Recruit Developers" and click Go.
- workstreams.ai will bring the task to your view.
Set top priority on the taskboard
Follow the basic rules of Kanban priorities for tasks. By ordering your tasks from the top (most important) to the bottom (least important) you and your closest collaborators will need to waste zero time wondering what to work on next.
In the web application
- Open the taskboard that contains the tasks you want to prioritize.
- Click on the task to open the focused view or alternatively use the three-dot menu.
- Select Set as top priority.
Open a specific task
This one’s a major time saver! If you are viewing a task in one of your channels, you can go right to where that task is located on the taskboard simply by using the ‘show on taskboard’ shortcut.
In Slack
- Find the task in your Slack conversations that you want to open on the workstreams.ai taskboard.
- Click the Show on taskboard button.
In Microsoft Teams
- Find the task in your Microsoft Teams conversations that you want to open on the workstreams.ai taskboard.
- Click the Open taskboard button.
Keyboard shortcuts
If you want to move as fast as possible within our task manager, your best bet is to keep these keyboard shortcuts in mind as you navigate through different tasks and taskboards.
Taskboard-wide shortcuts
- N Open a new task dialog
- F Access the filter bar
- ↑↓ Navigate dropdown menus
- ctrl / cmd + K Search for a channel taskboard
- M Open My tasks
- T Open Taskboards
- G Open Goals
- ? Show list of all keyboard shortcuts
Task shortcuts
- ctrl / cmd + D Duplicate the selected task
Dialogs
- enter Submit current form when a dialog is open
- esc Close an open dialog
You can always access a cheat sheet containing all the keyboard shortcuts near the bottom-left section of the workstreams.ai web app or by hitting the ? key.
Bulk actions on tasks
How many times does the need arise to assign multiple tasks to the same teammate? Or move a bunch of completed tasks with one swoop? Well, now you can! Use our nifty bulk actions feature and work on multiple tasks at once. Here's how.
In the web application
We all know spreadsheets right? Multiple selections work in a similar way in our app too!
- Navigate to the taskboard you want to work on
- Press and hold either the SHIFT or the CTRL or CMD button, depending on whether you are a Windows or a Mac user
- Select the tasks you want to manipulate
- When ready, press the 3dot menu or simply right click on any of the tasks selected
- Do your work!
You can use this trick to apply labels to a bunch of tasks, move them to another column, add due dates, save them in a template, and much more!